Mobile themes world free themes,wallpapers and more
Showing posts with label Tutorials. Show all posts

Saturday, November 21, 2009

Guide to take a screenshot of your theme


Guide to take a screenshot of your theme

This Tutorial is Shared by RobJM of Tehkseven


So you are viewing the screens you want to capture.
Guide to take a screenshot of your theme


A guide to taking screenshots of your theme for uploading.

We get asked this a lot , so here goes.

First I assume you have no graphics software as you would probably already know how to do this if you did.

You can download a free program called Paint.net from Here

For Nokia open up your theme in Carbide.
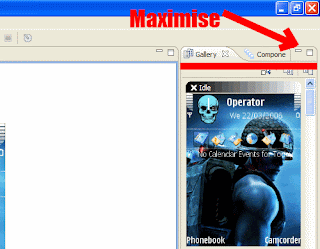
Select the Gallery tab, then maximise..
Attached Image

So you are viewing the screens you want to capture.
Attached Image

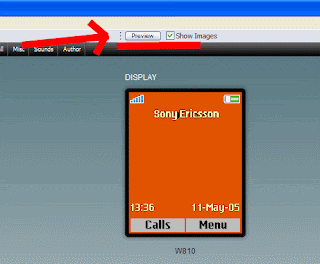
For Sony Ericsson open your theme in Theme Creator
and click the preview button.
Guide to take a screenshot of your theme
Make sure you are viewing your images at full size.
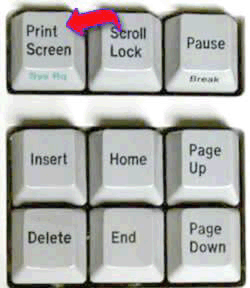
Press the Printscreen key [PRT-SCR] on your keyboard.
Guide to take a screenshot of your theme
This captures a 'picture' of your whole desktop.

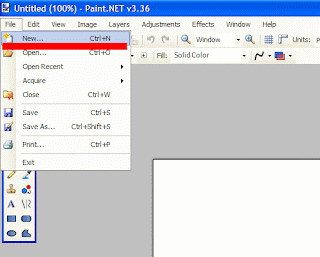
Now open up Paint.net, and select File then New
Guide to take a screenshot of your theme
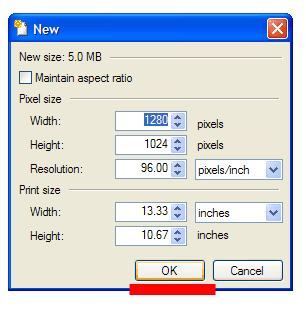
In the box that pops up just select OK
Guide to take a screenshot of your theme
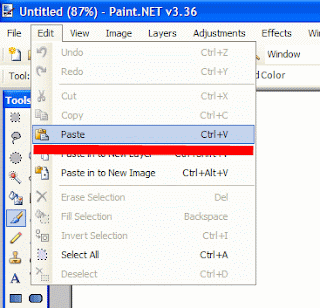
Then go back up to Edit then click Paste
Guide to take a screenshot of your theme
Now you will have your screen capture in Paint.Net,
go back up to View and select Actual Size
this will just make it easier to see what you are doing.
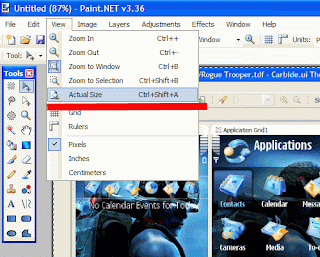
Guide to take a screenshot of your theme
Now go over to the toolbar down the left hand side and click on the rectangle select tool.
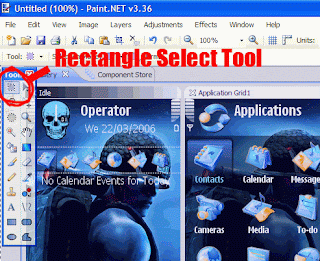
Guide to take a screenshot of your theme


A guide to taking screenshots of your theme for uploading.

We get asked this a lot , so here goes.

First I assume you have no graphics software as you would probably already know how to do this if you did.

You can download a free program called Paint.net from Here

For Nokia open up your theme in Carbide.
Select the Gallery tab, then maximise..
Attached Image

So you are viewing the screens you want to capture.
Attached Image

For Sony Ericsson open your theme in Theme Creator
and click the preview button.
Attached Image

Make sure you are viewing your images at full size.
Press the Printscreen key [PRT-SCR] on your keyboard.
Attached Image
This captures a 'picture' of your whole desktop.

Now open up Paint.net, and select File then New
Attached Image

In the box that pops up just select OK
Attached Image

Then go back up to Edit then click Paste
Attached Image

Now you will have your screen capture in Paint.Net,
go back up to View and select Actual Size
this will just make it easier to see what you are doing.
Attached Image

Now go over to the toolbar down the left hand side and click on the rectangle select tool.
Attached Image

Next put the cursor over the top lefthand corner of your desired screenshot, holding down the left mouse button ,drag it down to the bottom righthand corner of your screenshot and release.
If you make a mistake here just click outside your selection and repeat until your happy with the selection.
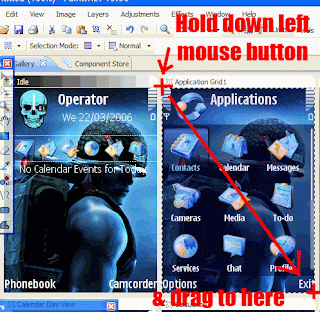
Guide to take a screenshot of your theme
Now go up to the top toolbar and click the Crop icon
If it's not quite selected correctly, just go up to Edit and select Undo and try again.
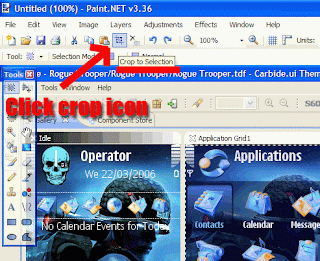
Guide to take a screenshot of your theme
And there you have your screenshot, just go up to File then Save As
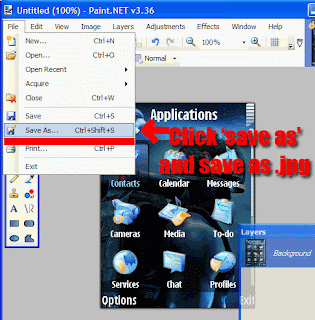
Guide to take a screenshot of your theme
Then name your screenshot i.e. screenshot1 and select your file type as jpg then click save.
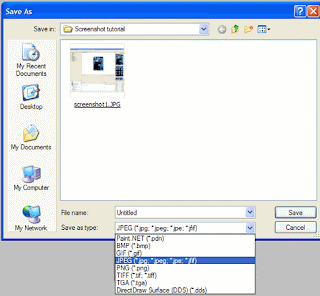
Guide to take a screenshot of your theme


A guide to taking screenshots of your theme for uploading.

We get asked this a lot , so here goes.

First I assume you have no graphics software as you would probably already know how to do this if you did.

You can download a free program called Paint.net from Here

For Nokia open up your theme in Carbide.
Select the Gallery tab, then maximise..
Attached Image

So you are viewing the screens you want to capture.
Attached Image

For Sony Ericsson open your theme in Theme Creator
and click the preview button.
Attached Image

Make sure you are viewing your images at full size.
Press the Printscreen key [PRT-SCR] on your keyboard.
Attached Image
This captures a 'picture' of your whole desktop.

Now open up Paint.net, and select File then New
Attached Image

In the box that pops up just select OK
Attached Image

Then go back up to Edit then click Paste
Attached Image

Now you will have your screen capture in Paint.Net,
go back up to View and select Actual Size
this will just make it easier to see what you are doing.
Attached Image

Now go over to the toolbar down the left hand side and click on the rectangle select tool.
Attached Image

Next put the cursor over the top lefthand corner of your desired screenshot, holding down the left mouse button ,drag it down to the bottom righthand corner of your screenshot and release.
If you make a mistake here just click outside your selection and repeat until your happy with the selection.
Attached Image

Now go up to the top toolbar and click the Crop icon
If it's not quite selected correctly, just go up to Edit and select Undo and try again.
Attached Image

And there you have your screenshot, just go up to File then Save As
Attached Image

Then name your screenshot i.e. screenshot1 and select your file type as jpg then click save.
Attached Image

Just repeat for a few other screenshots of your theme, to give an idea of what it looks like,you may have to move down your preview in carbide and take another screenshot to get some of the other images that are 'off screen'.

Click on the pink upload button at the top of the page at www.mmcforums.netAttached Image
Guide to take a screenshot of your theme
and fill in ALL the details [no title and it will be removed]
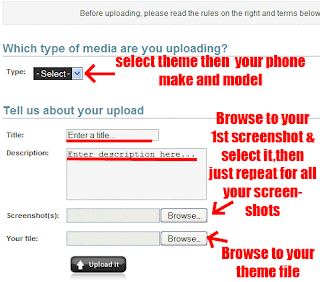
Guide to take a screenshot of your theme
There is also an application for Nokia users that you can put on your phone and capture screenshots straight to your phone it's called Screenshot


If you like this tutorial encourage us by subscrining to feed by email.

Friday, November 20, 2009

Convert A Cartoon Picture To A Svg Icon or image


Convert A Cartoon Picture To A Svg Icon or image
This Tutorial is shared by RobJM of Tehkseven


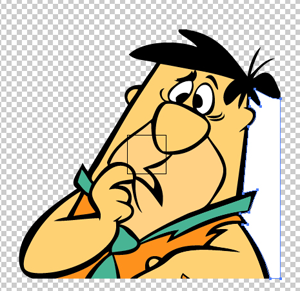
Here is how I made some svg icons and wallpapers from a jpg image for my Flintstones theme.

I used photoshop and illustrator, but I presume you can do the same with the free alternatives.

Cartoons are probably the easiest of images to convert to vector files, the better the image the easier it is, although it's possible to get good results even with quite poor images with a bit of tinkering.

This is for an icon but it's really just the same if you want to use it as a wallpaper, just adjust the finished size.
Here is the original file I used if you want to follow along > Attached File fred006.rar ( 235.22K ) Number of downloads: 15


This image I used was perfect for this, very easy to do.
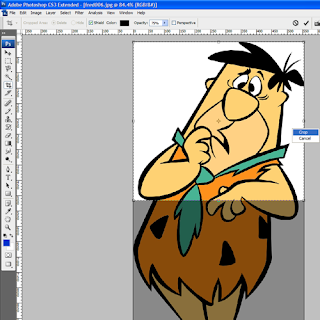
First open up your image in Photoshop and crop it roughly to a square of how you want your finished icon to look.
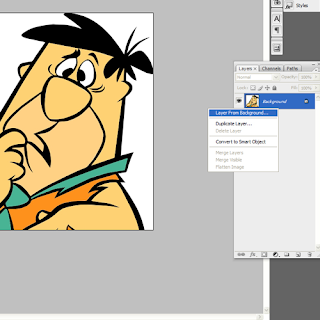
Then right click on the layer and select 'layer from background'
Convert A Cartoon Picture To A Svg Icon or image
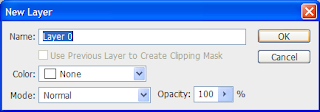
In the pop-up just select OK , it should be then same as below.
Convert A Cartoon Picture To A Svg Icon or image
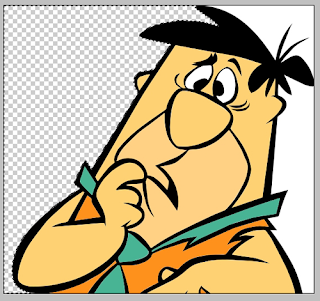
Next select the magic wand tool and select the white background with it and press delete on your keyboard to remove it, remove all the background.
Convert A Cartoon Picture To A Svg Icon or image
Save your image as a png file, then open that file in Illustrator.

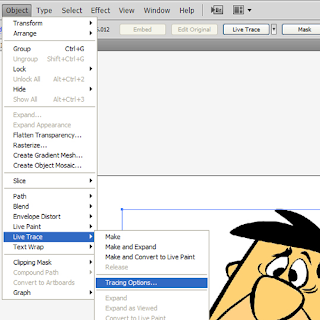
With your image selected, go to 'Object/Live Trace/Tracing Options.
Convert A Cartoon Picture To A Svg Icon or image
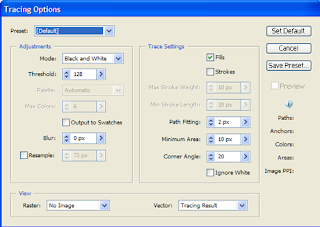
Move the box that pops-up to the side so you can see your image, now in the pop-up box you can see all your tracing options,tick the preview box to see how the settings affect the image.
Convert A Cartoon Picture To A Svg Icon or image
it depends on your image what settings you use, with this image it came out really good just by using Preset 'default' and Mode 'colour'.My final file size came out at 34kb, a bit big I thought for an icon.

I managed to half that file size by using the settings as in the screenshot above, Mode 'black and white' and then colouring the image myself.

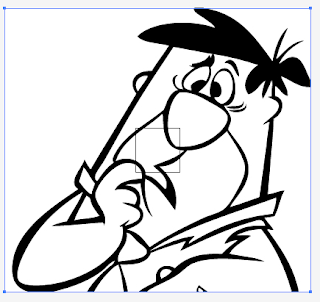
So select Mode 'Black and White' then press 'Trace' you should get something like this.
Convert A Cartoon Picture To A Svg Icon or image
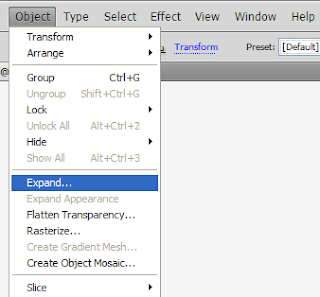
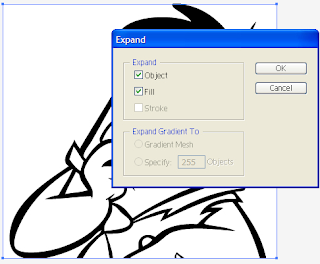
Next go to 'Object/Expand' then select OK.This basically splits the image up into the parts that are outlined by the 'black lines' so you can colour each part individually.
Convert A Cartoon Picture To A Svg Icon or image
Save it now as svg 1.0, untick 'preserved editing capabilities'.

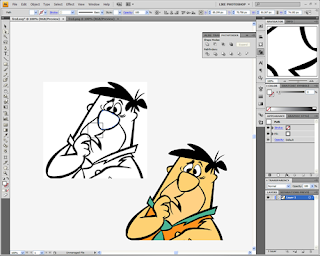
Next just to make things easier, I copied and pasted the original png file into this one, just to make it easier to select the colours.
Convert A Cartoon Picture To A Svg Icon or image
Next use the 'Direct Selection' tool [the 2nd arrow down] and select an area you want to colour, zoom in if you want to make sure you select the correct part, then choose the 'eyedropper tool' and click on the corresponding colour in your png image you pasted in, thats your selection coloured, now just repeat for you entire picture.
Convert A Cartoon Picture To A Svg Icon or image
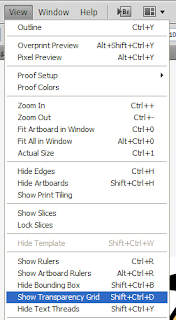
Once that's finished click on 'View/Show transparency grid' if it isn't already showing.
Convert A Cartoon Picture To A Svg Icon or image
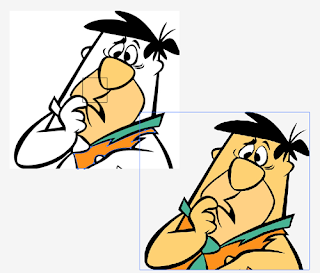
You will see the background is white, simply select it with the Direct Selection' tool as you did above, and press delete on you keyboard to remove it, do the same with each portion of the background.
Convert A Cartoon Picture To A Svg Icon or image
Also use the top 'Selection Tool' and select the png image you pasted in and delete it.

Now to make it an icon, go to 'File/New and make a new document 60x60 pixels, go back to your finished image,go to 'Select/ All then 'Edit /Copy'.
Go back to your 60x60 document and go to 'View/Actual Size' and then 'Edit / Paste' to paste you image in, it will be too big but just select it all , and resize it to fit [holding shift why you do this will keep it's proportions]
Once you have it roughly the right size you can zoom in and make finer adjustments.
Then save it as a svg 1.0 file, untick 'preserve editing capabilities' , that came out as 16kb for me, half the size of the colour mode version, and I'm sure there are other ways to tweak it, to get it smaller still.

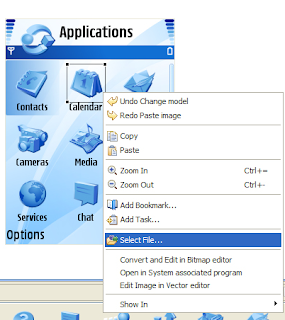
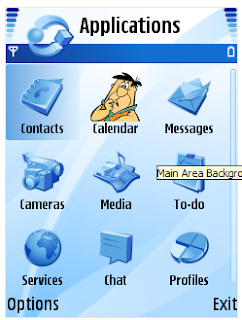
Next try it out in carbide...
Convert A Cartoon Picture To A Svg Icon or image
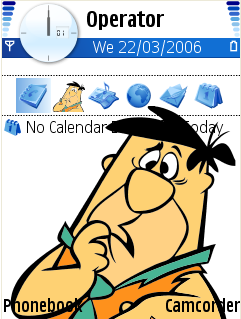
You could also use that 60x60 icon as a wallpaper,because it is vector it will resize to any size without degrading in quality, if you paste your image into a 60x80 [240x320 ratio] instead of the 60x60, you will have a 16kb wallpaper.
Convert A Cartoon Picture To A Svg Icon or image

If you like this tutorial then consider subscribing to my feed.

Thursday, October 29, 2009

Create 9 Piece Elements:dsma Rule

Create 9 Piece Elements:dsma Rule, Easiest way to make 9 piece elements.

Info:
This Rule is being made by One of the Biggest Russian Artiste as we all know him DSMA.

I am bringing to you the whole process of making 9 piece elements via Illustrator CS4.

Refer to Pictures above for your help.


How to create 9 piece Elements ?????? Courtest: DSMA

We need only Illustrator CS4 ...

Lets Begin


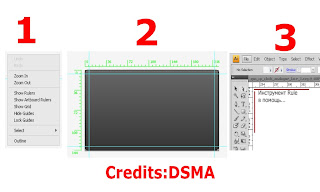
1. Draw a Template on the Eye by yourself as in the picture.


2. Create a new template ... include the appearance of both lines - Rule; Artboard Rule


3. see our template size Carbide.Ui or their own (dont get afraid to experiment),
as shown in the picture ... To do this, drag the mouse cursor the blue line (line) from the extreme left and extreme top of the scale of your template, aligning them to your size ...


4.Then choose Object - Slice - Clip to Artboard ... nothing happens - we just asked the option ...


5.Now the most interesting - the regime of pieces ... To do this, press - Object - Slice - Create from Guides ... Done ...

6.The final step - File - Save for Web and Devices ... allocate all of your pieces ... 9 extension Setting svg and click Save ... continue to choose the type of file - Images Only (. gif) and presses OK ...

7.All ... on the desktop or in a place where you pointed the way - will be daddy Image from 9 slices ... They are in order - as in carbide ... have only to insert them there, what are we waiting for?


As Rockliff suggests, so you will have the same result of the Thumbnails,but dont get afraid and just paste where you need to paste what.


You are done with your 9 piece elements.
shared by
Links:
Sunnylovesalman


Friday, October 9, 2009

Design Your Own Mobile Phone Tutorial


 How to Design Your Own Mobile Phone Tutorial

Info:
How to Design Your Own Mobile Phone Tutorial


All you will need is Adobe Photoshop (CS, CS2, CS3 or CS4).
After following the steps in this tutorial you should end up with something like this:

So let's start,
open a new photoshop document, and set the width and height to 450x615 pixels and resolution to 72 pixels/inch.Using the gradient tool (G). Set mode to Normal and opacity to 100%. Set a nice gradient going from light to dark and with the gradient tool go from the top to the bottom of the document.

Create a new layer (Layer> new> new layer) and take the Rounded rectangle tool (U).

How to Design Your Own Mobile Phone Tutorial
Make the basic outline of your phone. Now in the right bottom corner of the layer case right click on the layer with the shape, and select blending options. Set this options:
How to Design Your Own Mobile Phone Tutorial


Now create a new layer and use the Rounded Rectangle tool (U) and set the radius to 12px.
Now with black foreground make a screen for your mobile leaving enaugh space for navigations
and buttons. Set the following Blending options for this layer:

Inner shadow: Angle 135
Rest default

Gradient Overlay: Opacity; 12%
Angle 90
Rest default

Stroke: Size: 1
Outside
Normal
Opacity: 54%
Fill type: gradient
Angle: -159
Scale: 100


How to Design Your Own Mobile Phone Tutorial


Than on a new layer you will create the navigations. Take the Rounded rectangle tool and set radius to 20 px. You can make a close up to about 200% to make it button more neat. And make a small (about 45px high) button. now set the same blending options but add stain with this settings:
How to Design Your Own Mobile Phone Tutorial

Now with the move tool (V) you can place it right in the center.


Using the text tool (T) And type in 'OK' or anything else you want. With the move tool place it on the button you created. And you can set some blending options for your text if want.
Create a new layer and make navigations. I want to make small arrows using the line
tool (U) or the text tool (T). Using the move tool place them around the button.


Hi everyone,

This is a updated tutorial on how to create your own mobile phone in Adobe Photoshop.
Please leave a comment or send me a message. if you have any problems.

All you will need is Adobe Photoshop (CS, CS2, CS3 or CS4).
After following the steps in this tutorial you should end up with something like this:

Reduced 20%
Attached Image
457 x 624 (21.57K)


So let's start,
open a new photoshop document, and set the width and height to 450x615 pixels and resolution to 72 pixels/inch.Using the gradient tool (G). Set mode to Normal and opacity to 100%. Set a nice gradient going from light to dark and with the gradient tool go from the top to the bottom of the document.

Create a new layer (Layer> new> new layer) and take the Rounded rectangle tool (U).


Reduced 25%
Attached Image
662 x 28 (4.57K)


Make the basic outline of your phone. Now in the right bottom corner of the layer case right click on the layer with the shape, and select blending options. Set this options:

Attached Image

Attached Image

Attached Image


Now create a new layer and use the Rounded Rectangle tool (U) and set the radius to 12px.
Now with black foreground make a screen for your mobile leaving enaugh space for navigations
and buttons. Set the following Blending options for this layer:

Inner shadow: Angle 135
Rest default

Gradient Overlay: Opacity; 12%
Angle 90
Rest default

Stroke: Size: 1
Outside
Normal
Opacity: 54%
Fill type: gradient
Angle: -159
Scale: 100


Reduced 31%
Attached Image
536 x 717 (31.87K)


Than on a new layer you will create the navigations. Take the Rounded rectangle tool and set radius to 20 px. You can make a close up to about 200% to make it button more neat. And make a small (about 45px high) button. now set the same blending options but add stain with this settings:

Attached Image

Now with the move tool (V) you can place it right in the center.


Using the text tool (T) And type in 'OK' or anything else you want. With the move tool place it on the button you created. And you can set some blending options for your text if want.
Create a new layer and make navigations. I want to make small arrows using the line
tool (U) or the text tool (T). Using the move tool place them around the button.


How to Design Your Own Mobile Phone Tutorial

On a new layer use the rounded rectangle tool (U) and set the ratius to 15px.
Make a small recangle on one side of the phone, something like that:
How to Design Your Own Mobile Phone Tutorial

And it should set the previous blending options if not set them.
Now duplicate the layer and palce the button other side of the phone.

Using the text tool (T) type this symbol _ (Shift & -). Set the siye to 36 and font Arial
and set colour to green (10f020). Now duplicte this layer and set colour to red (fe0303)
With the move tool place red on right button and green on left button.

Now create a new layer, select the rounded rectangle tool (U) and set ratius to 7px.
Make a rectangle for the key pad. With the following blending options:

How to Design Your Own Mobile Phone Tutorial


Hi everyone,

This is a updated tutorial on how to create your own mobile phone in Adobe Photoshop.
Please leave a comment or send me a message. if you have any problems.

All you will need is Adobe Photoshop (CS, CS2, CS3 or CS4).
After following the steps in this tutorial you should end up with something like this:

Reduced 20%
Attached Image
457 x 624 (21.57K)


So let's start,
open a new photoshop document, and set the width and height to 450x615 pixels and resolution to 72 pixels/inch.Using the gradient tool (G). Set mode to Normal and opacity to 100%. Set a nice gradient going from light to dark and with the gradient tool go from the top to the bottom of the document.

Create a new layer (Layer> new> new layer) and take the Rounded rectangle tool (U).


Reduced 25%
Attached Image
662 x 28 (4.57K)


Make the basic outline of your phone. Now in the right bottom corner of the layer case right click on the layer with the shape, and select blending options. Set this options:

Attached Image

Attached Image

Attached Image


Now create a new layer and use the Rounded Rectangle tool (U) and set the radius to 12px.
Now with black foreground make a screen for your mobile leaving enaugh space for navigations
and buttons. Set the following Blending options for this layer:

Inner shadow: Angle 135
Rest default

Gradient Overlay: Opacity; 12%
Angle 90
Rest default

Stroke: Size: 1
Outside
Normal
Opacity: 54%
Fill type: gradient
Angle: -159
Scale: 100


Reduced 31%
Attached Image
536 x 717 (31.87K)


Than on a new layer you will create the navigations. Take the Rounded rectangle tool and set radius to 20 px. You can make a close up to about 200% to make it button more neat. And make a small (about 45px high) button. now set the same blending options but add stain with this settings:

Attached Image

Now with the move tool (V) you can place it right in the center.


Using the text tool (T) And type in 'OK' or anything else you want. With the move tool place it on the button you created. And you can set some blending options for your text if want.
Create a new layer and make navigations. I want to make small arrows using the line
tool (U) or the text tool (T). Using the move tool place them around the button.


Attached Image


On a new layer use the rounded rectangle tool (U) and set the ratius to 15px.
Make a small recangle on one side of the phone, something like that:

Attached Image

And it should set the previous blending options if not set them.
Now duplicate the layer and palce the button other side of the phone.

Using the text tool (T) type this symbol _ (Shift & -). Set the siye to 36 and font Arial
and set colour to green (10f020). Now duplicte this layer and set colour to red (fe0303)
With the move tool place red on right button and green on left button.

Now create a new layer, select the rounded rectangle tool (U) and set ratius to 7px.
Make a rectangle for the key pad. With the following blending options:

Attached Image Attached Image


Make a new layer and with the Rounded rectangle tool (U) make a bit smaller button than the
previous one but almost as wide. Now set this blending options for the layer:


How to Design Your Own Mobile Phone Tutorial


Now duplicate this layer 12 times and place each button to form a nice 4 rows
and 3 colums of buttons like this:


Hi everyone,

This is a updated tutorial on how to create your own mobile phone in Adobe Photoshop.
Please leave a comment or send me a message. if you have any problems.

All you will need is Adobe Photoshop (CS, CS2, CS3 or CS4).
After following the steps in this tutorial you should end up with something like this:

Reduced 20%
Attached Image
457 x 624 (21.57K)


So let's start,
open a new photoshop document, and set the width and height to 450x615 pixels and resolution to 72 pixels/inch.Using the gradient tool (G). Set mode to Normal and opacity to 100%. Set a nice gradient going from light to dark and with the gradient tool go from the top to the bottom of the document.

Create a new layer (Layer> new> new layer) and take the Rounded rectangle tool (U).


Reduced 25%
Attached Image
662 x 28 (4.57K)


Make the basic outline of your phone. Now in the right bottom corner of the layer case right click on the layer with the shape, and select blending options. Set this options:

Attached Image

Attached Image

Attached Image


Now create a new layer and use the Rounded Rectangle tool (U) and set the radius to 12px.
Now with black foreground make a screen for your mobile leaving enaugh space for navigations
and buttons. Set the following Blending options for this layer:

Inner shadow: Angle 135
Rest default

Gradient Overlay: Opacity; 12%
Angle 90
Rest default

Stroke: Size: 1
Outside
Normal
Opacity: 54%
Fill type: gradient
Angle: -159
Scale: 100


Reduced 31%
Attached Image
536 x 717 (31.87K)


Than on a new layer you will create the navigations. Take the Rounded rectangle tool and set radius to 20 px. You can make a close up to about 200% to make it button more neat. And make a small (about 45px high) button. now set the same blending options but add stain with this settings:

Attached Image

Now with the move tool (V) you can place it right in the center.


Using the text tool (T) And type in 'OK' or anything else you want. With the move tool place it on the button you created. And you can set some blending options for your text if want.
Create a new layer and make navigations. I want to make small arrows using the line
tool (U) or the text tool (T). Using the move tool place them around the button.


Attached Image


On a new layer use the rounded rectangle tool (U) and set the ratius to 15px.
Make a small recangle on one side of the phone, something like that:

Attached Image

And it should set the previous blending options if not set them.
Now duplicate the layer and palce the button other side of the phone.

Using the text tool (T) type this symbol _ (Shift & -). Set the siye to 36 and font Arial
and set colour to green (10f020). Now duplicte this layer and set colour to red (fe0303)
With the move tool place red on right button and green on left button.

Now create a new layer, select the rounded rectangle tool (U) and set ratius to 7px.
Make a rectangle for the key pad. With the following blending options:

Attached Image Attached Image


Make a new layer and with the Rounded rectangle tool (U) make a bit smaller button than the
previous one but almost as wide. Now set this blending options for the layer:

Attached Image Attached Image Attached Image


Now duplicate this layer 12 times and place each button to form a nice 4 rows
and 3 colums of buttons like this:

How to Design Your Own Mobile Phone Tutorial


Now use the text tool (T) and type in the numbers on the keypad. I used size 24 pt
and asenine wide font (Regular) sharp and colour dark white (#dadada)
After that type in the alphabet latters but in arial font and size 12 pt.

When you done that you can add some symbols like set to silent.
Go to custom shape tool (U) and find a music note. than using the line tool
make line across it like this:
How to Design Your Own Mobile Phone Tutorial
Now using the rounded rectangle tool (U) set ratius to 8px and on a new
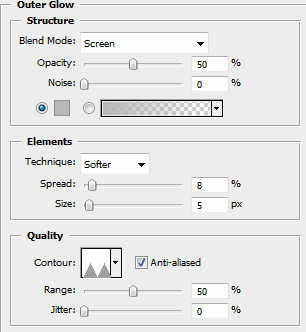
layer make a rectangle for the speaker and set this blending options:

Inner shadow & Outer glow the ame as last time

How to Design Your Own Mobile Phone Tutorial
Now click on the layer with your basic shape of the phone and make a selection of it by holding ctrl and click. Create a new layer and take the gradient tool and set the gradient to some thing like this
How to Design Your Own Mobile Phone Tutorial
And set the opacity to 45%. Now go from left side to right.
Using the pen tool (P) select the points on about half part of the phone

Than right click and make selection. Create a layer mask and now follow this steps.

Click on each layer individually and hold ctrl + click and it should select the part, than go to
the gradient layer which should be at the top and press delete. Do this to each part of the phone
that is covered in gradient apart from the basic shape. You might want to change the opacity in the layer style.

And that's it!, You can add a wallpaper of your choice and change anything you want.
How to Design Your Own Mobile Phone Tutorial
Than right click and make selection. Create a layer mask and now follow this steps.

Click on each layer individually and hold ctrl + click and it should select the part, than go to
the gradient layer which should be at the top and press delete. Do this to each part of the phone
that is covered in gradient apart from the basic shape. You might want to change the opacity in the layer style.

And that's it!, You can add a wallpaper of your choice and change anything you want.

How to Design Your Own Mobile Phone Tutorial
And there are lot's of different ways and technics of crering your own design.


All Credits to Olek


    Follow me on Twitter
     
    HOME | ABOUT ME | CONTACT ME

    Mobile Phone Customization Copyright © 2009 Community is Designed by BieModified By TheShadow

    back to top